
1. Install script
First, install capifony itself with RubyGems:
gem install capifony
2. Setup project
Setup initial deployment configuration for your project:
cd path/to/your/project
capifony .
This will create a Capfile in your project root, and a deploy.rb config file
in config/ (for symfony 1.x projects) or in app/config/ (for Symfony2
projects).
3. Configure
Fill up your config/deploy.rb (or app/config/deploy.rb) with your server
connection data. But first, you must choose your deployment strategy.
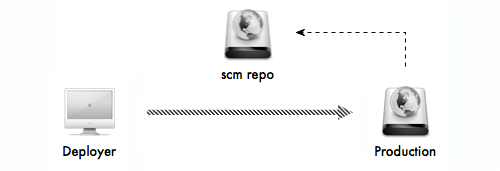
a) deployment → scm → production
The first strategy involves deployment to a production server via an intermediate git repository server. In this case, the production server must have access to your Git repository (remote or not) and be able to issue a “pull” from it. You must have ssh access to the production server from wherever you’re deploying from:
# deploy.rb

set   :application,   "My App"
set   :deploy_to,     "/var/www/my-app.com"
set   :domain,        "my-app.com"

set   :scm,           :git
set   :repository,    "ssh-gitrepo-domain.com:/path/to/repo.git"

role  :web,           domain
role  :app,           domain, :primary => true

set   :use_sudo,      false
set   :keep_releases, 3
In this case, on every cap deploy, capifony will:
- ssh to production (
my-app.com) - create a new release path (
/var/www/my-app.com/releases/...) - clone the latest project version from the remote git repo (
ssh-gitrepo-domain.com) - copy the source code, pulled from git, into the release path
- run deployment hooks (
cache:warmup,cc, etc.)
NOTE : By default capifony doesn’t clean releases. To execute the clean releases task, it’s necessary to set the
keep_releasesparam and to add the task after end deploy in the deploy.rb file, like this:after "deploy", "deploy:cleanup"
If you don’t want to clone the whole repository on every deploy, you can set the
:deploy_via parameter:
set :deploy_via, :remote_cacheIn this case, a git repository will be kept on the server and Capifony will only fetch the changes since the last deploy.
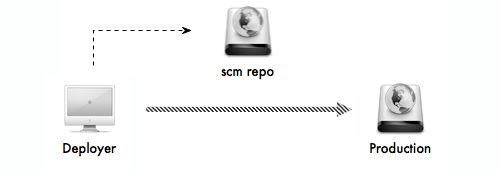
b) deployment → production (via copy)
The second strategy involves deployment to a production server right from your deployment machine via a copy. In this case, the deployment server (which may just be your local computer) must have access to the git repository (remote or not), and be able to pull from it.
As vendors are still installed on the production server it is worth noting that
if any of your vendors are remote private repositories you will need pull access
for any of these repositories on your production server otherwise install via composer
or bin/vendors will fail. You will need to use the following cookbook entry if you want
to install vendors locally before deploy - Install vendors locally before deploy.
The deployment server must also have ssh access to the production server:
# deploy.rb

set   :application,   "My App"
set   :deploy_to,     "/var/www/my-app.com"
set   :domain,        "my-app.com"

set   :scm,           :git
set   :repository,    "file:///Users/deployer/sites/my-app"
set   :deploy_via,    :copy

role  :web,           domain
role  :app,           domain, :primary => true

set   :use_sudo,      false
set   :keep_releases, 3
In this case, on every cap deploy, capifony will:
- ssh to production (
my-app.com) - create a new release path (
/var/www/my-app.com/releases/...) - clone the latest project version from the local git repo
- copy the source code, pulled from git, onto the production server via wires
- run deployment hooks (
cache:warmup,cc, etc.)
Of course, copying the whole project on every deploy is very expensive and slow.
Fortunately, you can optimize things with the
capistrano_rsync_with_remote_cache gem:
gem install capistrano_rsync_with_remote_cache
Now, change your deployment strategy in deploy.rb:
set :deploy_via, :rsync_with_remote_cacheIn this case, rsync will create a cache on your production server and will push only files that have changed between deploys.
4. Setup server
Now, you can start the deployment process! To get your server setup with the
directory structure that Capistrano expects, cd to your local project
directory and run:
cap deploy:setup
(You’ll only have to run this once!)
This command will create the following approximate directory structure on your server. The exact structure will depend on if you’re deploying a symfony 1.x or Symfony2 application:
`-- /var/www/my-app.com
|-- current → /var/www/my-app.com/releases/20100512131539
|-- releases
|   `-- 20100512131539
|   `-- 20100509150741
|   `-- 20100509145325
`-- shared
   |-- web
   |    `-- uploads
   |-- log
   `-- config
       `-- databases.yml
The folders in the releases directory will be the actual deployed code, as
timestamped directories. In a symfony 1.x application, for example, Capistrano
symlinks your log & web/uploads directories from your app to the
directories in the shared folder so that it doesn’t get erased when you deploy a
new version of your code.
To quickly setup a new server, you can do:
cap HOSTS=new.server.com deploy:setup
5. Deploy!
To deploy your application, simply run:
cap deploy
Depending on your setup, you may need to ssh onto your server to setup
additional, shared files after your first deployment (e.g.
app/config/parameters.yml if you’re using Symfony2 with the deployment recipe
listed below).
Something went wrong???
cap deploy:rollback
Symfony2 Deployment
If you’re deploying a Symfony2 application, then this section is probably for
you. This section explains how to configure capifony to deploy an application
that uses the bin/vendors file to manage vendor libraries and the
app/config/parameters.yml file for server-specific configuration (like
database connection information).
First, add the following to your app/config/deploy.rb file so that the
parameters.yml file is shared between all deployments:
set :shared_files, ["app/config/parameters.yml"]Next, share the vendor directory between all deployments to make deploying
faster:
set :shared_children, [app_path + "/logs", web_path + "/uploads", "vendor"]To install your vendors, capifony will rely on bin/vendors by default.
But the recommended dependency manager is now
Composer. In order to use it, just add the following
configuration:
set :use_composer, trueIf you want to update your vendors, add the following parameter:
set :update_vendors, trueIt will run composer.phar update if you use Composer, bin/vendors otherwise.
Note that the bin/vendors can be configured using the :vendors_mode
parameter to decide which action to run (upgrade, install, or reinstall).
The final step is to configure your app/config/parameters.yml file. The best
way to do this is to create this file in shared folder on server manually:
ssh your_deploy_server
mkdir -p /var/www/my-app.com/shared/app/config
vim /var/www/my-app.com/shared/app/config/parameters.yml
Once your parameters.yml file is correctly configured, you should be able to
test your deployed application. On every subsequent deploy, that same
app/config/parameters.yml file will be symlinked into your application,
meaning you only need to configure after the initial deploy.
Useful Tasks
If you need to deploy and run your migrations you can call:
cap deploy:migrations
To run your test suite on the production server, just invoke:
cap deploy:test_all
You can invoke tasks/commands by calling:
cap symfony
If you want to see all available tasks, you can run:
cap -vT
Configuration References
## Cookbook
To learn more about capifony, you can read these recipes:
Enabling/Disabling applications
Using the Multistage extension
Shared folders with symfony 1.x
Specifying Deployment Dependencies
Managing External Vendors with Composer
Setup an automatic upload of parameters file
Deployment in clustered machines
How to keep Symfony2 sessions after deploy
Install vendors locally before deploy
Known Issues
If you get the following error message sudo : no tty present and no askpass
program specified, add this parameter:
default_run_options[:pty] = true